Form Check with Your Phone: Angles that Matter: Dopamine Detox (2025)
Form Check with Your Phone: Angles that Matter (2025)
Table of Contents
🧭 What this guide is—and why angles matter
Your smartphone is a surprisingly capable motion-check tool. With a stable camera, good lighting, and slow-motion capture, you can review joint positions and bar paths to spot common technique issues before they become plateaus or injuries. Peer-reviewed studies show smartphone goniometry (measuring joint angles from photos/video) can be reasonably valid and reliable for field use when protocols are followed (consistent camera angle, identifiable landmarks, and repeatable positioning). Form checks won’t replace a qualified coach, but they give you quick, objective feedback between sessions.
How this helps your training
-
Reduces trial-and-error by making technique visible.
-
Highlights one or two priority cues (instead of guessing).
-
Improves confidence and safety, especially when lifting alone.
-
Creates a repeatable record of progress (depth, bar speed, range of motion).
A note on “dopamine detox”: you don’t need to “detox” from dopamine (a normal neurotransmitter). What you do need is distraction detox while training—minimize the notification/reward loop that pulls attention away from quality reps.
🛠️ Quick start: 5-minute setup
-
Pick the lift & angle. Start with side view for squats, hinges, presses; front/45° view for knee tracking and asymmetries.
-
Stabilize the phone. Tripod or shelf at ~hip height; lens at 90° to the motion plane; distance 2–4 m (6–12 ft) so the whole body fits.
-
Record settings. Use 60–120 fps, gridlines on, good lighting. Avoid wide-angle distortion (don’t stand too close to the lens).
-
Film 3–5 reps. Pause at end range for a clean frame or scrub in slow-mo.
-
Mark and measure. In your app, drop points on shoulder–hip–knee–ankle–wrist. Compare to the ranges below; adjust one cue at a time.
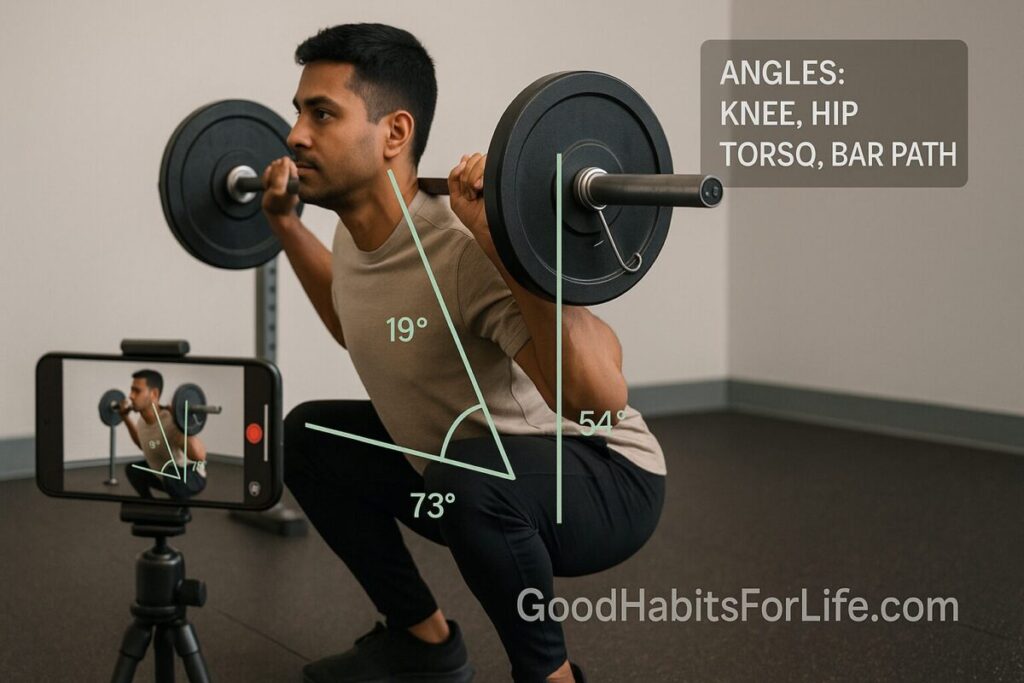
📐 Angles that matter (by exercise)
The ranges below are practical targets for most healthy adults. Mobility, limb lengths, training goals, and comfort matter—so treat these as safe, productive zones, not absolutes.
Squat (back/front/goblet)
-
Depth: Hip crease at or below knee (knee flexion typically 100–130° at “parallel”).
-
Torso vs tibia angle: From side view, torso angle ≈ shin angle at the bottom—helps balance and spine neutrality.
-
Knee tracking (front view): Knees track over 2nd–3rd toe; avoid valgus collapse.
-
Heels: Stay down; barpath roughly vertical over midfoot.
Common fixes
-
Heels lifting → elevate heels 1–2 cm or reduce depth until ankle mobility improves.
-
Knees caving → “press the floor apart,” slightly wider stance, control descent.
Deadlift / Hip Hinge
-
Setup: Shoulders slightly in front of the bar, hips above knees but below shoulders; neutral spine.
-
Bar path: Vertical over midfoot; bar skims shins on the way up.
-
Hip angle at start: Often 55–75° (varies with limb lengths/style).
-
Shin angle: Minimal forward knee travel in conventional; more in sumo.
Common fixes
-
Bar drifting → pull the slack, lats tight (“show your logos on your shirt to the wall”).
-
Rounding → lighter load + tempo eccentric to groove hinge pattern.
Push-Up / Bench Press (technique carryover)
-
Elbow angle from torso: 30–60° (about “4 or 5 o’clock” from top view) to reduce shoulder stress.
-
Wrist under shoulder at bottom; forearm vertical.
-
Body line: Ear–shoulder–hip–ankle straight; no sag through the lumbar spine.
Common fixes
-
Flaring → rotate hands slightly out; “screw palms into floor,” keep elbows soft.
-
Sagging → squeeze glutes/ribs down, shorten ROM to good positions.
Lunge / Split Squat
-
Front shin angle: Roughly vertical at bottom; knee over mid-foot (not collapsed inward).
-
Torso: Slight forward lean is fine; keep ribs stacked over pelvis.
-
Step width: Hip-width rails (not on a tightrope) for balance.
Overhead Press
-
Bar path: Straight line over midfoot; ends over the ear from side view.
-
Forearm vertical under the bar; wrists neutral.
-
Ribs/pelvis: “Ribs down, glutes on”—avoid excessive lumbar extension.
Plank / Side Plank
-
Neutral line: Ear–shoulder–hip–knee–ankle aligned.
-
Pelvis: Slight posterior tilt to avoid low-back sag.
Quick reference table
| Movement | Priority angles (side view unless stated) | Productive range |
|---|---|---|
| Squat | Knee flexion at bottom | 100–130° (parallel+) |
| Squat | Torso ≈ Tibia | Similar angles |
| Deadlift | Hip hinge with neutral spine | Bar vertical over midfoot |
| Push-Up | Elbow from torso | 30–60° |
| Lunge (front view) | Knee over mid-foot | No valgus collapse |
| Overhead Press | Bar over ear/midfoot | Forearm vertical |
| Plank | Head–to–ankle line | Neutral, no sag |
🧠 Techniques & frameworks for self-coaching
S.A.F.E. Framework
-
Set the camera: stable, right height, right view.
-
Anchor points: mark shoulder/hip/knee/ankle/wrist.
-
Focus on one cue: choose the highest-leverage change.
-
Execute & evaluate: repeat 3–5 reps; keep the change if it feels stronger and looks cleaner.
Two-Angle Rule
-
Record a side view and either front or 45° view. Many errors are invisible from a single angle.
One-Cue Rule
-
Apply one external cue per set (“knees over toes,” “ribs down,” “drag the bar up your legs”). More than one = confusion.
Progression Rule
-
When position is consistent, progress load or range, not both at once.
👥 Audience variations
-
Beginners/teens: Use bodyweight or light goblet variations. Aim for repeatable positions before adding load.
-
Busy professionals: Batch record on Day 1 of the week; review clips during commute (audio off!).
-
Parents at home: Use stable shelves or a chair as a tripod; film in daylight near a window.
-
Seniors/new lifters: Prioritize pain-free ROM. Box squats, elevated push-ups, and dowel hinges are perfect.
-
Students/athletes: Add simple bar-path overlays for compound lifts to monitor speed and consistency.
⚠️ Mistakes & myths to avoid
-
Myth: There’s one “perfect” angle. Human bodies vary. Use ranges and sensations (stable, strong, pain-free).
-
Parallax errors. If the lens isn’t square to the movement plane, angles will look off. Re-film, don’t over-cue.
-
Wide-angle distortion. Don’t stand too close to the lens; it exaggerates torso/shin angles.
-
Front-camera trap. Rear camera is usually higher quality and less distorted.
-
Cue overload. Fix the big rock (bar path, knee tracking, spinal neutrality) first.
-
“Dopamine detox” dogma. You’re not detoxing a neurotransmitter; you’re minimizing distractions so quality reps win.
🗣️ Real-life examples & cue scripts
Squat (knees cave):
-
What you see: Knees collapse inward at the bottom from front view.
-
Cue script: “Press the floor apart,” “Knees track over 2nd–3rd toe,” “Show me your logo (chest proud) but keep ribs down.”
-
Drill: Mini-band just above knees for 2 warm-up sets.
Deadlift (bar drifts forward):
-
What you see: Bar path curves away from shins mid-pull.
-
Cue script: “Lats to pockets,” “Shave your shins,” “Pull the slack first.”
-
Drill: 2-sec pauses 2–3 cm off the floor.
Push-Up (elbows flare):
-
What you see: Elbows at ~90° from torso.
-
Cue script: “Screw hands into floor,” “Aim elbows to the pockets,” “Ribs down, glutes tight.”
-
Drill: Elevated push-ups on a bench to groove angles.
🧰 Tools, apps & resources
-
Video basics: Native Camera (iOS/Android) with 60–120 fps, gridlines on.
-
Angle & overlay tools: Kinovea (desktop, free), Dartfish Express (mobile), OnForm (mobile), generic protractor/goniometer apps.
-
Pose/bar-path: Open-source pose libraries (e.g., MediaPipe Pose) are appearing in many apps; look for “bar path” overlays for presses/squats/deadlifts.
-
Stands & lighting: Inexpensive phone tripod; clamp light or daylight near a window.
-
Focus modes: iOS Focus / Android Do Not Disturb = your simple “distraction detox.”
Pros: fast feedback, portable, affordable. Cons: depends on camera placement, can miss subtleties a coach would see.
🗓️ 7-Day Starter + 30-60-90 Habit Plan
7-Day Starter
-
Day 1: Set up tripod spot, test side + front views for one lift (e.g., goblet squat).
-
Day 2: Film 3–5 reps, mark knee/hip/ankle; pick one cue for the week.
-
Day 3: Apply cue in warm-ups; re-film 3 reps. Save best frame.
-
Day 4: Add a second angle (45°). Check knee tracking and bar/weight path.
-
Day 5: Light mobility for your limiter (e.g., ankles), re-film.
-
Day 6: Add one more movement (hinge or push). Same process.
-
Day 7: Review clips; write 3 bullet wins + 1 cue for next week.
30-60-90 Roadmap
-
Days 1–30: Master two movements (e.g., squat + push-up). Record 1 set per session; confirm angles in productive ranges.
-
Days 31–60: Add deadlift/hinge and one single-leg pattern. Begin bar-path checks and tempo work.
-
Days 61–90: Progress load or ROM systematically; introduce overhead press and plank progressions. Keep one “technique set” per lift on camera each week.
🧾 Key takeaways
-
Your phone + good camera placement = powerful DIY form audit.
-
Measure what matters: knee, hip, torso, shoulder angles and bar path.
-
Two angles beat one; one cue beats three.
-
Progress position → then range → then load.
-
“Distraction detox” your sessions for better focus and safer reps.
❓ FAQs
Is a smartphone accurate enough for angle checks?
Yes—for basic range and alignment checks, studies show smartphone angle measures can be valid with consistent camera placement and clear landmarks. Use the same setup each time.
How often should I film?
Early on, record one set per movement each session. As consistency improves, switch to weekly spot-checks.
Do I need special markers or tape on joints?
Not required, but contrasting clothing and visible knees/hips help. Some apps let you tap landmarks frame-by-frame.
What if my anatomy makes textbook angles uncomfortable?
Prioritize pain-free, strong positions. Adjust stance width, bar position, or ROM within safe ranges.
Can I “dopamine detox” for better workouts?
You can—and should—minimize phone distractions, but you’re not detoxing dopamine itself. Use Focus Mode, silence notifications, and plan your playlist ahead.
When should I see a coach or clinician?
If pain persists, if you’re returning from injury, or if technique changes don’t resolve persistent issues.
What frame rate is best?
60 fps is plenty. 120 fps helps for fast lifts or bar-speed checks.
Front or rear camera?
Use the rear camera for better optics and less distortion.
📚 References
-
World Health Organization. Physical activity. https://www.who.int/news-room/fact-sheets/detail/physical-activity
-
American College of Sports Medicine. ACSM Guidelines—Resistance Training Basics. https://www.acsm.org
-
Mitchell K et al. Reliability and validity of iPhone goniometer app for knee range of motion. J Arthroplasty. https://pubmed.ncbi.nlm.nih.gov/ (search: “iPhone goniometer knee reliability”)
-
Charlton PC et al. Validation of smartphone-based measurement of movement and posture. Sensors. https://www.mdpi.com/journal/sensors
-
Escamilla RF. Knee biomechanics of the squat exercise. Med Sci Sports Exerc. https://pubmed.ncbi.nlm.nih.gov/
-
Swinton PA et al. A biomechanical analysis of straight and hexagonal bar deadlifts. J Strength Cond Res. https://pubmed.ncbi.nlm.nih.gov/
-
Calatayud J et al. Push-ups vs bench press: EMG comparisons. J Strength Cond Res. https://pubmed.ncbi.nlm.nih.gov/
-
Harvard Health Publishing. “Dopamine fasting” is all hype. https://www.health.harvard.edu/blog
-
Google Research. MediaPipe Pose. https://developers.google.com/mediapipe/solutions/vision/pose
Note: Some journal links above are PubMed/generic entry points to avoid paywalls; search the exact titles if a direct open-access link isn’t available.
Disclaimer: This article offers general fitness education and is not a substitute for personalized medical or rehabilitation advice; consult a qualified professional for individual guidance.